
Most people only think about email headers after they run into an email problem.
It could be a message claiming to be from your CEO that doesn't look quite right, a legitimate client email that somehow ends up in Junk, or an outbound campaign that suddenly starts missing inboxes despite no changes to your setup.
While these issues seem unrelated, they often have one thing in common. The email header contains the information you need to understand what happened.
Every email carries a detailed record of its journey, including the servers it passed through and the authentication checks it passed or failed, such as SPF, DKIM, and DMARC.
Knowing how to read this information can help you verify an email's authenticity, investigate phishing attempts, troubleshoot deliverability issues, and identify the root cause of inbox placement problems.
In this guide, you'll learn how to view email headers in every version of Outlook and, more importantly, how to interpret them with confidence.
Every email has two parts. The body is what you read, and the header is what the servers read. The header is a chunk of metadata attached to the top of every message that records where the email came from, where it went, who signed for it along the way, and whether it passed the checks receiving servers use to verify legitimacy.
Think of it like the shipping label on a package. The body is the package. The header is every stamp, tracking number, and signature the package collected between the sender's warehouse and your front door. Every mail server the message passed through added its own line, which is why headers on emails that travelled through multiple hops can look long and intimidating.
But that noise is actually a chronological record. Once you know which fields to look at first and what they mean, you can pull real information out of a header in under a minute.
Nobody reads email headers for fun. You are either investigating something suspicious or diagnosing something broken. There are four reasons this actually comes up, and knowing which one you are dealing with changes what you focus on inside the header.
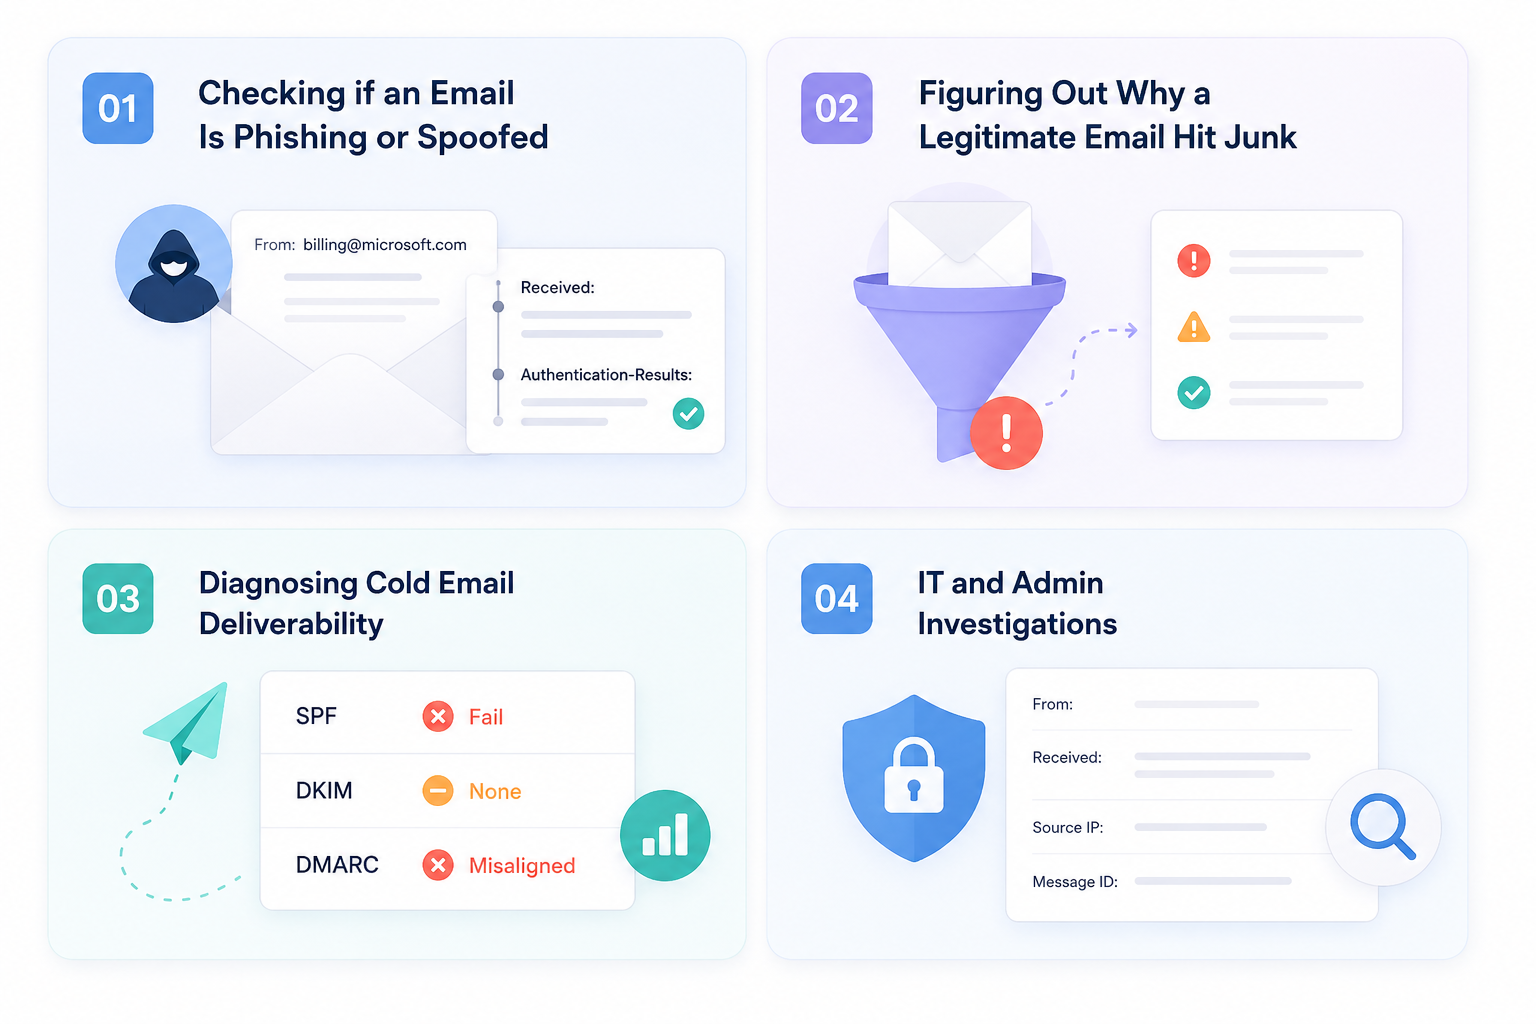
The From field is trivially easy to fake. A convincing phishing email might show "[email protected]" in your inbox while actually originating from a compromised server halfway across the world. The header is where the deception falls apart. The Received chain and the Authentication-Results block cannot be spoofed the same way the From field can, which makes them the first place to look when something feels off.
Spam filters leave fingerprints. Sometimes a message gets flagged because the sending IP has a poor reputation, sometimes because DKIM failed, sometimes because the content triggered a score threshold. The header tells you which one it was, and that tells you whether the fix is on the sender's side or yours.
This is where things get technical. If your cold outreach is underperforming and you have ruled out the copy and the list, the header on a test email you send to yourself will tell you whether your infrastructure is the problem. SPF fails, DKIM none, DMARC misalignment — these all show up plainly in the header and each one points to a different domain reputation issue you need to fix before you send another campaign.
When a user reports a suspicious message, the header is the paper trail. It tells you the actual source of the email, which is what you need to file an abuse report or block an attacker at the network level.
The steps depend on which version of Outlook you are using. Microsoft has been rolling out New Outlook alongside Classic for the past couple of years, and the two clients handle this differently, so a walkthrough you read a year ago might not match what you see on your screen today. Below are the clean paths for every environment.
New Outlook is the client Microsoft is pushing users toward, and the click path is shorter than Classic.
The dialog is scrollable and you can select all the text with Ctrl+A. If you plan to paste the header into an analyzer tool, copy the entire block including the blank lines.
Classic Outlook is the version most enterprise users still run, and the path here has not changed in years.
The Internet headers box is small and does not resize, which makes reading in place awkward. Paste it into a text editor or an analyzer for anything beyond a quick glance.
Outlook on the Web (the browser version at outlook.office.com) handles this cleanly.
If you use Outlook on the Web through a work account, your admin might have restricted this option. If you do not see View message details, that is why.
Outlook for Mac uses different terminology than the Windows versions. What Windows calls Internet Headers, Mac calls All Headers. Same thing, different label.
To copy, select the text with your cursor and use Cmd+C. There is no dedicated dialog box on Mac, so the header sits inline with the message.
Here is the honest answer. The Outlook mobile app does not expose full internet headers. There is no menu path that gets you there.
The workaround is to forward the email to yourself and open it on desktop or on Outlook on the Web. If you cannot get to a desktop, open outlook.office.com in your phone's browser and follow the web instructions above.
This limitation is not unique to Outlook, most email apps on mobile hide headers entirely, so it is a workflow constraint worth accepting rather than fighting.
The raw header looks chaotic on first glance, but it follows a predictable structure.
The trick is knowing which fields matter and scanning them in the right order. Below is the sequence I actually use, which is not the order the fields appear in the raw header. It is the order that gets you to a diagnosis fastest.
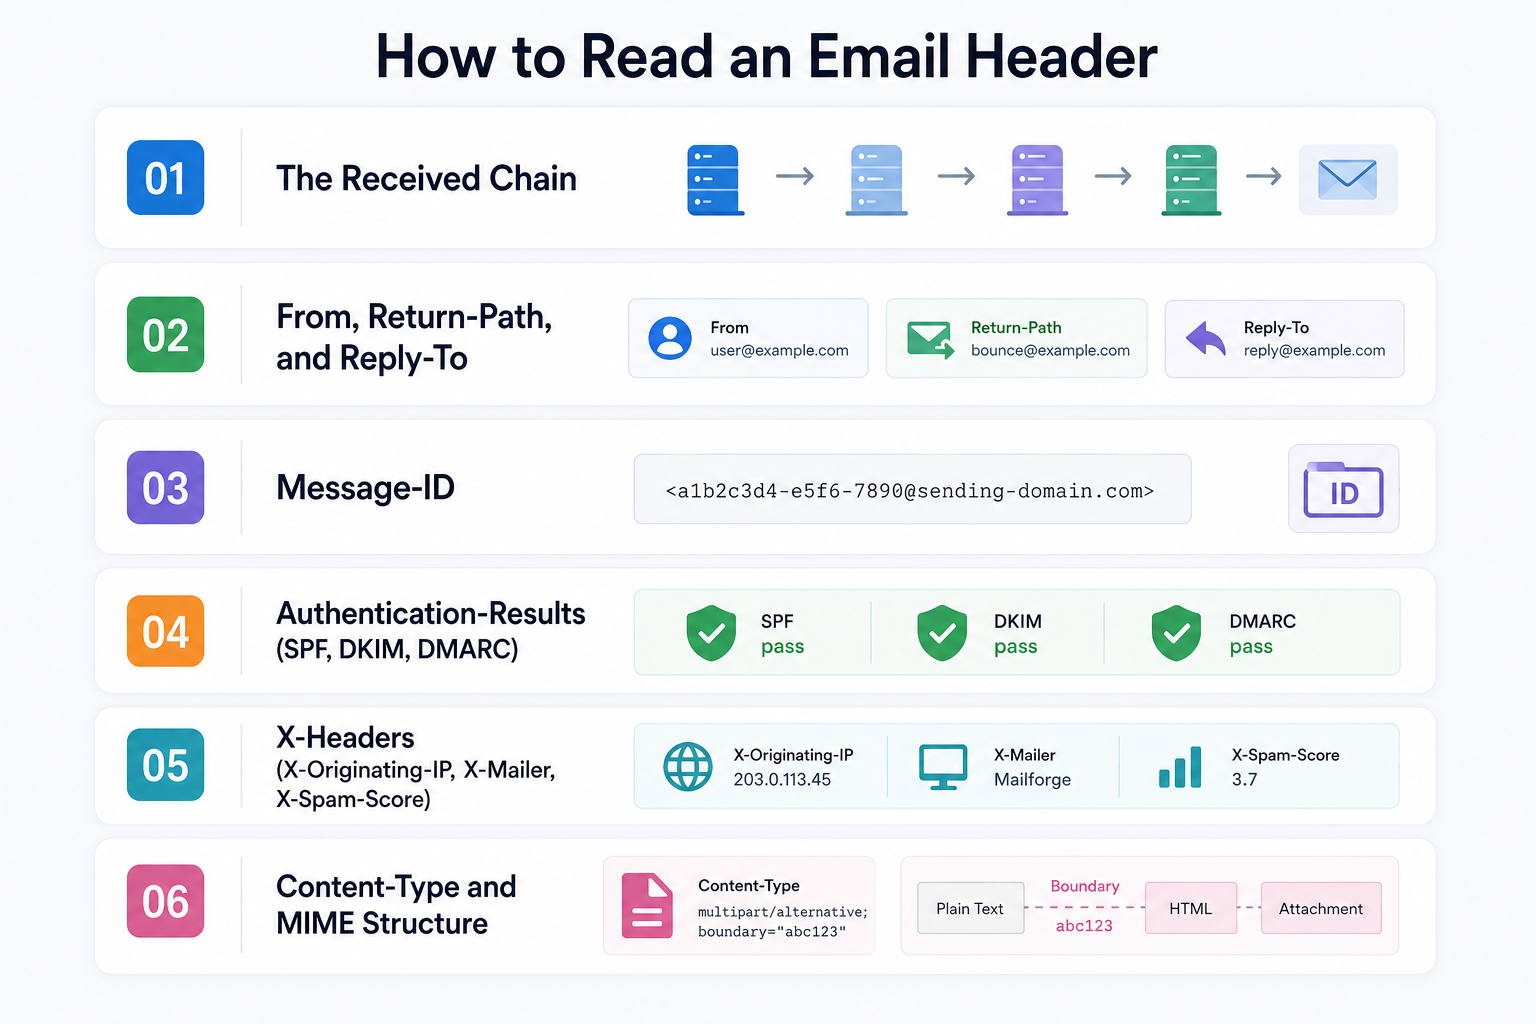
The Received lines are the delivery trail. Every mail server that touched the message added one line, and those lines stack in reverse chronological order.
The one rule that trips everyone up is that you read them from bottom to top. The bottom Received line is the original sending server, the first hop in the journey. The top Received line is the last server before the message hit your inbox. If you read top to bottom, you are reading the journey backwards.
Each line typically shows the sending server, the receiving server, the timestamp, and the IP address of the sender. Some lines include reverse DNS information, which tells you the hostname associated with the sending IP.
What makes the Received chain so valuable for phishing detection is that it cannot be spoofed in the same way the From field can. A spoofed From address will still leave a real Received chain behind it. If an email claims to come from paypal.com but the bottom Received line shows the message originated from a random VPS in a country with no relationship to PayPal, the chain has already given you the answer.
You are looking for three things when you scan the Received chain. Does the origin server make sense for the claimed sender? Does the timing between hops look reasonable, or are there unexplained delays? Does the origin IP have proper reverse DNS pointing to the sender's actual domain? A missing PTR record on the origin server is a common red flag on both spoofed mail and poorly configured cold email infrastructure, which is why domain reputation work starts here.
These three fields all deal with sender identity, and they can all say different things. Understanding the difference between them is one of the most useful skills you can pick up from reading headers.
The From field is what shows up in your inbox. It is the display name and address you see next to the sender's avatar. It is also the field with the weakest verification. Setting the From address to anything you want is trivial, which is why every serious phishing attempt starts here.
The Return-Path is where bounce notifications go if the message fails to deliver. This is the real sender in most legitimate mail because it points back to the actual sending infrastructure. If the message is legit, the Return-Path domain will usually match or be closely related to the From domain, or it will match a known email service provider that is signing on behalf of the sender.
The Reply-To field is where replies get directed if the recipient hits reply. This is often blank on legitimate mail because most senders want replies to go to the From address. When it is set to something different, it is worth looking at closely.
The diagnostic pattern here is simple. If the From says one thing, the Return-Path says something completely unrelated, and the Reply-To points to a third domain, you are almost certainly looking at spoofed mail or a phishing attempt. For example, seeing From: [email protected] paired with Return-Path: [email protected] is a near-certain indicator of a spoofed sender, unless PayPal is using a known email service provider that would explain the mismatch.
Every legitimate email is assigned a unique Message-ID by the mail server that first accepted it for delivery. The format is usually a random string followed by the sending domain in angle brackets, like <[email protected]>.
The domain in the Message-ID should match the actual sending server. If it does not, that is worth noticing. The Message-ID is also what you reference when filing support tickets, tracing a specific email through server logs, or asking an ESP to investigate a delivery issue. It is the closest thing an email has to a serial number.
Compared to the other fields, the Message-ID is low on interpretation. It either matches the sending infrastructure or it does not. But it is useful to know it exists and what it is for, because IT teams and email support desks will ask for it constantly.
If you only read one section of the header, read this one. The Authentication-Results block is where receiving servers record the outcome of the three checks that determine whether an email is verified as coming from the domain it claims. Those three checks are SPF, DKIM, and DMARC, and they are the backbone of modern email trust.
SPF stands for Sender Policy Framework. It is a check that asks a simple question: was the IP that sent this message authorized to send mail for the claimed sending domain? The domain owner publishes a list of authorized IPs in a DNS record, and the receiving server compares the actual sending IP against that list. A pass means the IP was authorized. A fail means it was not.
DKIM stands for DomainKeys Identified Mail. This one is cryptographic. The sending server signs the message with a private key, and the receiving server verifies that signature against a public key published in the sender's DNS. A DKIM pass tells you the message was signed by someone with access to the sending domain's private key and that the message was not modified in transit. A DKIM fail means the signature could not be verified, and a DKIM none means the message was never signed in the first place.
DMARC ties the two together. It tells receiving servers what to do when SPF or DKIM fails and whether the domain in the From field aligns with the domain being checked. A DMARC pass means the message survived alignment and the domain owner's policy considers it legitimate. A DMARC fail means either the underlying checks failed or the alignment did not hold.
A healthy Authentication-Results block on a legitimate email looks like spf=pass, dkim=pass, dmarc=pass. All three green. A compromised or spoofed message often shows spf=fail, dkim=none, and dmarc=fail, which is the pattern that receiving filters use to route mail into Junk or reject it outright.
For cold emailers, this block is the single best diagnostic tool you have for your own outbound. If your test emails come back showing DKIM fail, your signature is misconfigured or your DNS is out of sync. If SPF fails, the sending IP is not listed in your SPF record for the sending domain. Both are common when SPF, DKIM, and DMARC are set up manually across a lot of domains and a record gets missed somewhere.
This is honestly the reason I stopped setting up cold email infrastructure manually.
Mailforge handles SPF, DKIM, and DMARC automatically for every domain and mailbox you spin up, so the Authentication-Results block on your outbound mail comes back clean by default.
When you are running two hundred domains, the risk of a single missed record breaking a whole sending segment is not worth the hours saved doing it yourself.
X-headers are non-standard fields that mail servers, spam filters, and email clients add to messages for their own tracking and diagnostic purposes. The X prefix marks them as extensions rather than part of the core email standard. Different servers add different X-headers, and their absence is not itself a red flag.
X-Originating-IP tells you the actual IP address the message was composed from, not just the sending server that relayed it. This field is not always present because it depends on the sender's mail server choosing to include it. When it is there, it is useful for narrowing down the true source of a suspicious message beyond what the Received chain shows.
X-Mailer identifies the software or platform that sent the message. Legitimate mail clients like Outlook, Apple Mail, and Thunderbird show up here, and so do email service providers and cold outreach tools. Some receiving filters have learned to flag specific X-Mailer values associated with bulk senders, which is worth knowing if your outbound is landing in spam.
X-Spam-Score is a numeric score assigned by the receiving server's spam filter. Higher numbers mean the filter judged the message as more spam-like. If a legitimate cold email you sent shows a high X-Spam-Score in the recipient's header, that is the receiving server telling you something in the content, reputation, or authentication tripped its threshold. The score itself will not tell you which one, but it confirms that a filter engaged.
Content-Type describes the format of the message body. It tells the receiving client whether the email is plain text, HTML, or a combination of both, and whether there are attachments.
Multipart/alternative is the format you want to see on any cold email. It means the message contains both a plain text version and an HTML version, and the recipient's client picks which one to display. Sending plain text only can look sparse and unprofessional in modern clients, and sending HTML only can trigger spam filters that expect a text alternative for accessibility. Multipart/alternative gives you the best of both.
MIME boundaries are the strings that separate the different parts of a multipart message. They look like --random-boundary-string and mark where the text body ends and the HTML body begins, or where an attachment starts. You do not usually need to read these, but knowing what they are keeps you from being thrown off when you see them in a raw header.
Now that you know what the fields mean, here is what the header is actually telling you when you put it all together. Four common scenarios, each with a concrete pattern you can look for.
Spoofed mail follows a recognizable pattern once you know where to look.
The From field looks legitimate on the surface, often mimicking a known brand or an internal colleague. But the Return-Path is a completely unrelated domain, usually something disposable like a free hosting service or a random cheap TLD. The Received chain shows the message originated from an IP that has no relationship to the claimed sender, and reverse DNS on that IP either fails or points to a generic hosting provider. The Authentication-Results block usually shows spf=fail or dmarc=fail, sometimes both.
Any one of these signals in isolation could have an innocent explanation. All of them stacked together in the same header almost never does.
When a legitimate email ends up in Junk, the header will usually tell you why if you know where to look.
The X-Spam-Score, if present, gives you the receiving filter's overall judgement. The Authentication-Results block tells you whether authentication was clean. Partial fails are common culprits here: SPF pass but DKIM fail, or DMARC misalignment even when both SPF and DKIM pass individually. The Received chain can show that the sending IP has a poor reputation, especially if reverse DNS is missing or if the IP has been flagged by blocklists in the past.
Microsoft 365 also adds its own diagnostic headers under the X-Microsoft-Antispam family. These are not always human-readable, but they contain the spam filter's reasoning encoded in short values. If you are troubleshooting delivery to Outlook and Microsoft mailboxes specifically, these headers are worth learning to decode.
An SPF failure in Authentication-Results is one of the most common issues on cold email, and it is almost always a DNS problem.
The header will show spf=fail or spf=softfail. To diagnose, cross-reference the sending IP from the Received chain with the SPF record published on the sending domain. If the sending IP is not in the SPF record, that is your fix — the record needs to be updated to include it. A common cause on cold email specifically is sending from multiple domains without configuring an SPF record on each one, or forgetting to include a newly added mail server in the record. A softfail usually means the record is set to a soft policy and the receiving server is treating the failure as a warning rather than a hard block, but it still hurts your reputation over time.
DKIM failures come in two flavours, and they mean different things.
dkim=none means the message was never signed at all. Either DKIM was not configured on the sending domain, or the mail server sent the message without applying the signature. dkim=fail means the message was signed but the signature could not be verified against the public key in DNS. This usually points to a DNS misconfiguration, a mismatch between the signing key and the published key, or the message being modified somewhere in transit.
For cold emailers, the most common cause of both is DNS. A DKIM key was published but with a syntax error, or the key was rotated on the sending server without being updated in DNS. Either way, the fix is at the DNS level, which is exactly the kind of thing that gets tedious and error-prone when you are managing infrastructure across dozens of sending domains. Getting DKIM right is one of the core deliverability fundamentals and worth investing in before you scale.
Parsing a header manually gets tedious once you have done it a hundred times, and analyzers save real time when you just need a quick answer. Two tools cover most use cases.
MXToolbox Email Header Analyzer is the one most people reach for first. Paste in the raw header, and the tool returns a parsed breakdown with the Received chain visualised as delivery time between each hop. You can see at a glance where the message spent the most time and whether any hop introduced an unusual delay. It also flags authentication results and any obvious anomalies. Good for phishing investigations and one-off deliverability checks.
Google Admin Toolbox Messageheader is cleaner and faster if all you want is a quick authentication verdict. It shows SPF, DKIM, and DMARC results front and centre, along with a summary of the delivery path. Less visual than MXToolbox but easier to scan.
Reach for a tool when you need a fast answer or when you want to share a parsed view with a colleague. Read manually when you want to build the intuition to spot patterns across many headers. Both skills matter, and the manual reading is what makes you actually useful when a tool disagrees with your gut and you have to make a call.
One safety note. Neither tool is going to steal your data for typical use, but both process whatever header you paste in. If you handle mail with sensitive routing information or internal server names you would rather not expose, read the terms first or run the analysis in a private environment.
If you send cold email, the headers you generate are being read by receiving servers the exact same way you just learned to read them. Every weak signal in your outbound header is a weak signal to a spam filter, and the compounding effect across thousands of sends is what separates campaigns that land in the inbox from campaigns that quietly disappear into Junk.
Here is what to audit on your own outbound mail. Send a test to yourself from every sending domain you use and check each field.
SPF pass, DKIM pass, DMARC pass. Any fail on any of the three is a problem, and any none on DKIM specifically means signing is broken on that domain. This is the first field to check on every new sending domain, and the first field to recheck if a campaign starts underperforming out of nowhere.
If it points somewhere unexpected, something in your sending configuration is misrouting bounces, which also affects how receiving servers judge sender identity. A mismatched Return-Path is a soft signal to filters that the sender might not be who they claim to be, even when the underlying authentication passes.
A generic VPS IP with no PTR record is a red flag to receiving filters and one of the most common reasons cold campaigns from cheap infrastructure land in spam. Reverse DNS should resolve to a hostname that matches your sending domain, not to a generic hosting provider string. If it does not, that is a fix worth making before you send another campaign.
If it references some third-party ESP domain instead of yours, receiving servers might treat the message as forwarded rather than original, which changes how they evaluate it. On legitimate mail from your own infrastructure, the Message-ID domain should match the sending domain every time.
Some cold email platforms leave fingerprints in these fields that receiving filters have learned to associate with cold outreach. It is worth checking what your sending tool actually writes into your outbound headers and whether it is broadcasting your setup in a way that hurts you.
The reason I ended up on Mailforge for email infrastructure is that all of this — SPF, DKIM, DMARC, reverse DNS, clean sending IPs — is handled automatically.
I stopped auditing my own headers for basic authentication issues because there were none to audit. If you are scaling past a handful of domains and setting up DNS manually every time, this is exactly where the wheels come off. A single missed SPF entry or a botched DKIM rotation on one domain can silently kill your deliverability on that segment, and you will not know until conversion drops and you finally check the headers.
The path depends on your version. In Classic Outlook for Windows, open the email in its own window and go to File → Info → Properties. In New Outlook and Outlook on the Web, open the email and use the three-dot menu at the top of the message, then choose View → View message details. In Outlook for Mac, use the View menu in the macOS menu bar, then Message → All Headers.
No, the Outlook mobile app does not expose full internet headers on either iOS or Android. The workaround is to forward the email to yourself and open it on desktop, or open outlook.office.com in your phone's browser and use the web version instructions.
The From address is what you see in your inbox and is the easiest field to spoof. The Return-Path is where bounce notifications go and reflects the real sending infrastructure in legitimate mail. A mismatch between the two, especially when the domains are unrelated, is one of the clearest signals of a spoofed or phishing message.
On an incoming email, an SPF or DKIM failure means the message could not be verified as coming from the domain it claims, which is a strong signal of spoofing or misconfiguration on the sender's side. On a cold email you sent yourself, the same failure means your own DNS setup is broken and receiving servers cannot verify your outbound mail, which will hurt inbox placement until it is fixed.
Yes for standard use. Tools like MXToolbox and Google Admin Toolbox Messageheader parse the header you paste in and do not resell your data for typical use. That said, if the header contains sensitive routing information or internal server names, read the terms of service or run the analysis in a private environment before pasting.
DKIM=none means DKIM was never configured on the sending domain and the message was sent without a signature. The fix is to publish a DKIM key in the sending domain's DNS and configure the sending server to sign outbound mail with it. This is one of the fundamentals of cold email domain health and worth setting up correctly before running any campaigns from a new domain.