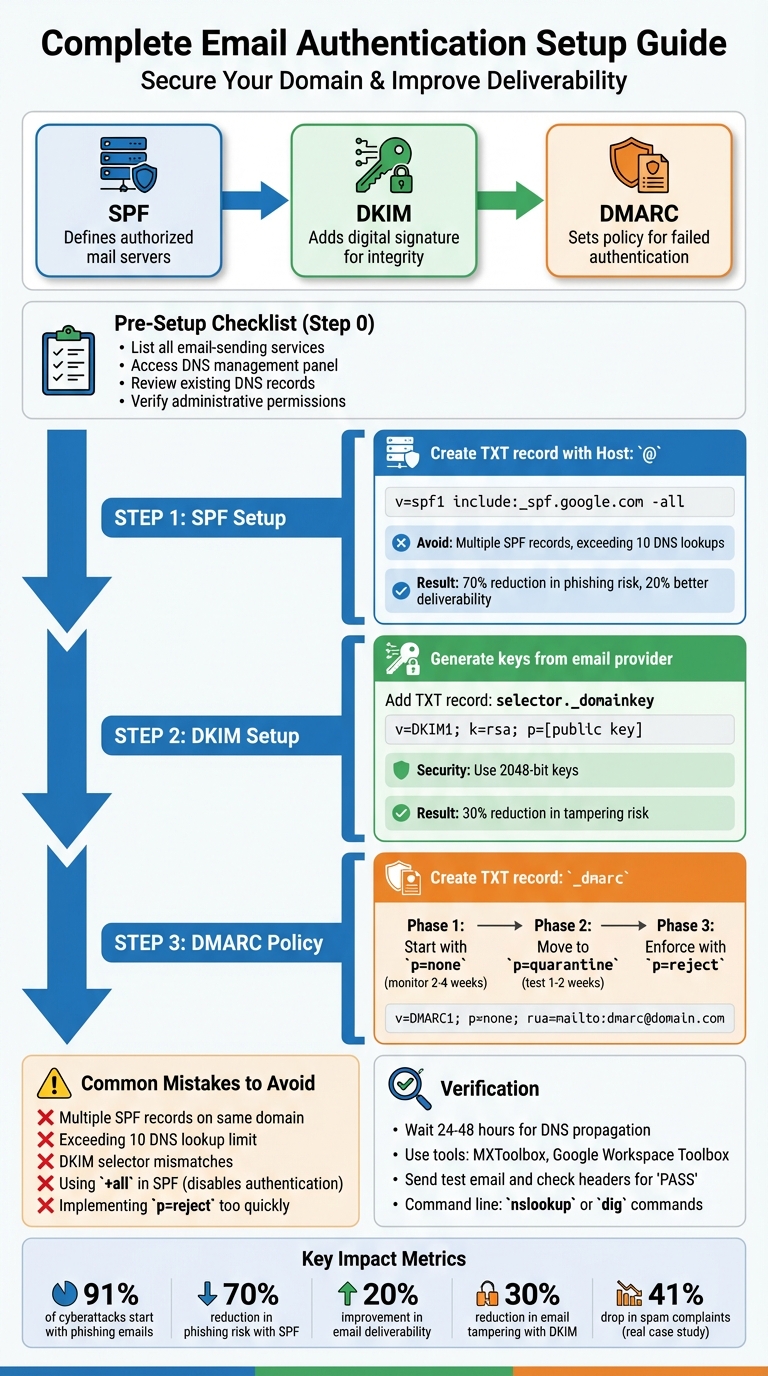
Want to keep your emails out of spam and protect your domain from phishing attacks? Setting up SPF, DKIM, and DMARC is the solution. These email authentication protocols work together to verify your emails, safeguard your domain, and improve deliverability. Here's the quick breakdown:
Why it matters: Without these, your emails risk being flagged as spam, or worse, your domain could be exploited for scams. This guide walks you through the setup process step-by-step, ensuring your email system is secure and functional.
Key steps include:
Pro Tip: Tools like Mailforge can simplify managing these records across multiple domains, saving time and reducing errors. Ready to secure your emails? Let’s dive in.
SPF DKIM DMARC Email Authentication Setup Process Guide
Before diving into DNS configuration, it's crucial to gather all the necessary details and ensure you have proper access to avoid mistakes. Considering that 91% of cyberattacks begin with phishing emails, starting with a well-organized checklist is key to setting up SPF, DKIM, and DMARC effectively.
Begin by identifying every service that sends emails on behalf of your domain. This includes your primary email provider, tools for cold outreach like Mailforge or Salesforge, CRM platforms, marketing automation tools, and transactional email services. Missing even one service can disrupt email authentication.
Create a detailed inventory for each email-sending service, including:
For SPF, you'll need IP addresses or "include" statements, such as include:_spf.google.com. For DKIM, collect the public key and selector name (e.g., google or mandrill). For DMARC, set up an email address to receive aggregate reports. This thorough documentation ensures consistent and error-free authentication across all platforms.
Locate your DNS management panel, which is usually hosted by your domain registrar or DNS provider (e.g., GoDaddy, Namecheap, Cloudflare). Check your billing records if you're unsure who your provider is. Once logged in, look for sections like "DNS Management", "DNS Settings", or "Zone File Editor."
"If you can view these records but can't edit them, make sure to request elevated permissions before proceeding." - Akvilė Marčiukaitytė, Infraforge
Confirm that you have administrative access to view and modify DNS records, including A, CNAME, MX, and TXT entries. Having editing rights, not just view-only access, is essential for making changes.
Take a close look at your current DNS records to identify any existing SPF, DKIM, or DMARC entries that might conflict with your new setup. For example, multiple SPF records on the same domain can cause authentication issues, and outdated DKIM selectors from previous providers might create confusion.
Check for common syntax errors, such as extra spaces, missing semicolons, or misplaced version tags (e.g., v=spf1 should always appear at the start). Regular audits, ideally every quarter, are a good practice to remove outdated mail servers and prevent "record drift", which can lead to configuration problems.
Once you've completed this pre-setup checklist, you're ready to move on to configuring your SPF records in the next step.
Once you've tackled your pre-setup checklist, the next logical move is configuring your SPF record. SPF, or Sender Policy Framework, is a DNS TXT record that defines which servers are authorized to send emails on behalf of your domain. This simple step can slash the risk of phishing attacks using your domain by up to 70% and boost your email deliverability rates by as much as 20%.
An SPF record starts with v=spf1, followed by mechanisms (like ip4: or include:) and ends with a qualifier (-all, ~all, or +all). The mechanisms list the servers allowed to send emails, while the qualifier dictates how to handle unauthorized emails. Here's a quick breakdown:
-all: Rejects unauthorized emails outright (hard fail).~all: Flags unauthorized emails as suspicious (soft fail).+all: Accepts all emails, which defeats the purpose of SPF and should never be used.| SPF Component | Function | Example |
|---|---|---|
| Version | Identifies the record as SPF | v=spf1 |
| Mechanisms | Lists authorized senders | ip4:192.0.2.0, include:_spf.google.com |
| Qualifiers | Specifies actions for unauthorized emails | -all (Reject), ~all (Soft Fail), +all (Allow all) |
To set up your SPF record, log in to your DNS management panel and locate the TXT records section. Create a new TXT record, setting the Host or Name field to @ (representing your root domain). Then, paste your SPF string into the Value or Content field, ensuring it includes all email-sending sources.
For instance, if you're using Google Workspace and Mailforge for email campaigns, your SPF record might look like this:
v=spf1 include:_spf.google.com include:_spf.mailforge.ai -all
Make sure to include all the services you use to send emails. Once saved, DNS changes usually take a few hours to propagate but may take up to 48 hours.
One of the biggest pitfalls is creating multiple SPF records for the same domain. This will cause authentication to fail. If you need to add new services, consolidate everything into a single v=spf1 string, separating entries with spaces.
Another common issue is exceeding the 10 DNS lookup limit. Each include: statement counts as a lookup, and exceeding this limit invalidates your SPF record. To avoid this, you can either use SPF flattening or replace include: statements with ip4: entries where feasible.
Avoid using +all at all costs - it effectively disables SPF authentication. Also, double-check for common syntax errors like missing dashes (e.g., -all instead of all) or unintended spaces in your SPF string.
"SPF is not a one-time job - you have to keep checking your SPF record to ensure it's appropriately configured." - Akvilė Marčiukaitytė, Infraforge
Once you've confirmed your SPF record is working as intended, you're ready to move on to configuring DKIM records to add another layer of email security.
Once you've secured SPF, it's time to set up DKIM to ensure your emails remain intact and untampered during transit. DKIM plays a key role in protecting your email integrity, reducing tampering risks by about 30%.
"DKIM, or DomainKeys Identified Mail, is a vital email authentication method that helps verify the sender's identity and guarantees the content has not been tampered with during transit." - Carlos Ascanio, Salesforge
The first step is generating your DKIM keys, which are essential for validating your email's authenticity.
Log in to your email provider's admin panel - whether it's Google Workspace, Microsoft 365, or Mailforge. Navigate to the authentication settings and locate the option to generate DKIM keys. Your provider will create a pair of keys: the private key stays secure with your email service, while the public key is added to your DNS records.
You'll also receive a selector, a unique identifier like "google", "mail", or "2024sep", which helps differentiate this DKIM key. Make sure to note both the selector and the public key, as you'll need them in the next step. If you're using Mailforge, the platform can streamline this entire process across multiple domains, saving you a lot of time and effort.
Head to your DNS management panel and create a new TXT record. Here's what you'll need to do:
._domainkey (e.g., mail._domainkey). Remember, some DNS providers automatically append your root domain, so double-check their documentation if you're unsure.v=DKIM1; k=rsa; p= followed by a long encoded string.Accuracy is critical here - tiny mistakes like extra spaces or misplaced characters can disrupt your setup. Set the TTL (Time to Live) to 3,600 seconds (1 hour) or use your provider's default value.
| DKIM Component | Description | Example Value |
|---|---|---|
| Record Type | The type of DNS record required | TXT |
| Host/Name | Selector + ._domainkey |
mail._domainkey |
| Version (v) | Identifies the DKIM version | v=DKIM1 |
| Algorithm (k) | The key type used (usually RSA) | k=rsa |
| Public Key (p) | The encoded public key string | MIIBIjANBgkqhkiG... |
| TTL | Time to Live (propagation time) | 3600 (1 hour) |
Once you've saved your DNS changes, allow up to 48 hours for propagation - though updates often take effect much sooner. To confirm your setup, send a test email to a Gmail account. Open the message, click the three-dot menu, and choose "Show original." Look for "DKIM: PASS" in the authentication results.
You can also verify through command-line tools. On Windows, use nslookup -type=txt selector._domainkey.yourdomain.com in Command Prompt. For Mac or Linux, run dig txt selector._domainkey.yourdomain.com in Terminal. Alternatively, online tools like MXToolbox or Red Sift Investigate can help identify any issues with formatting or mismatched selectors.
Make sure the selector in your email service provider matches the host name prefix in your DNS records exactly. For instance, if your provider uses "mandrill" as the selector, your DNS record must be mandrill._domainkey. For stronger security, opt for 2048-bit keys.
With DKIM successfully verified, you're ready to advance to the next step in securing your email system.
After successfully configuring SPF and DKIM, DMARC acts as the final layer of your email authentication setup. It determines how receiving servers handle unauthenticated emails, stopping spoofed messages from landing in inboxes.
To get started, log into your DNS panel and create a TXT record. In the Host or Name field, enter _dmarc (some providers may require _dmarc.yourdomain.com). Then, in the TXT record's Value field, use the following format:
v=DMARC1; p=none; rua=mailto:[email protected]
Replace [email protected] with the email address where you’d like to receive DMARC reports. These reports, sent in XML format, will help you track which emails pass or fail authentication. Set the TTL to 3,600 seconds or use the default value provided by your DNS host. Once the record is published, you can begin monitoring its performance.
With the DMARC record in place, the next step is to monitor how it performs. Start with a policy of p=none, which allows all emails to be delivered while collecting data on their authentication status. Spend at least two to four weeks analyzing these reports. This will help you identify legitimate email sources and fix any misconfigurations. If your subdomains have different sending behaviors, you can specify separate policies for them using the sp= tag. For instance, setting sp=quarantine will apply stricter rules to subdomains while keeping p=none for your main domain.
| DMARC Policy | Action Taken by Receiving Server | When to Use |
|---|---|---|
p=none |
Emails are delivered as usual; no action taken. | Ideal for initial setup and monitoring. |
p=quarantine |
Unauthenticated emails go to the spam/junk folder. | Use during the intermediate phase to test enforcement. |
p=reject |
Unauthenticated emails are blocked entirely. | Best for full protection against email spoofing. |
Once you’re confident that legitimate emails are passing authentication, update your DMARC record to p=quarantine. This policy redirects unauthenticated emails to spam folders, providing a buffer to ensure everything functions correctly. Monitor the results for one to two weeks, then move to p=reject for full protection. At this stage, unauthenticated emails are completely blocked, preventing them from reaching any recipients.
If you manage multiple domains, tools like Mailforge can simplify the process by automating DMARC updates across your infrastructure. To ease into enforcement, use the pct= tag to apply the policy gradually. For example, pct=50 enforces the policy on only half of your email traffic, giving you a chance to assess its impact before rolling it out fully.
Once your DNS records have propagated (usually within 24–48 hours), it’s time to verify your setup. This step ensures that your email authentication is working as expected and that everything is configured properly.
To check your DNS records, command-line tools can be incredibly helpful. On Windows, open Command Prompt and type nslookup -type=txt yourdomain.com to view your SPF records. If you’re on macOS or Linux, use dig txt yourdomain.com for the same purpose. For DKIM records, you’ll need your selector - for example, default._domainkey.yourdomain.com. To check DMARC, query _dmarc.yourdomain.com.
For a more visual approach, tools like MXToolbox or Google Workspace Toolbox are great options. They not only validate your DNS records but also perform health checks and syntax reviews. Platforms like What’s My DNS are particularly useful for tracking DNS propagation across servers worldwide, helping you confirm whether your changes have reached different regions.
Once propagation is complete, send a test email to yourself and inspect the email headers. In Gmail, you can click Show original to review the Authentication-Results section. Look for "pass" results for SPF, DKIM, and DMARC. If any fail, it’s time to revisit your DNS configurations.
Even with careful setup, issues can arise. Here’s how to address some of the most common problems with SPF, DKIM, and DMARC.
1. Multiple SPF Records
This is one of the most frequent errors. DNS allows only one SPF record per domain, so having duplicates will cause authentication failures. If you use multiple email services, combine their "include" statements into a single TXT record. If that’s not feasible, consider SPF flattening, which converts hostnames into IP addresses to stay within the 10-lookup limit. Exceeding this limit will cause SPF validation to fail, even if your syntax is correct.
2. DKIM Selector Mismatches
A mismatch occurs when the selector in your DNS record doesn’t align with what your email server expects. Double-check that the selector in your DNS matches your email server’s configuration. If you’ve recently rotated keys, ensure the public key in your DNS matches the private key on your server. For security, always use 2,048-bit RSA keys - keys shorter than 1,024-bit are considered insecure.
3. DMARC Alignment Failures
Alignment issues happen when the domain in your "From" header doesn’t match the domain validated by SPF or DKIM. This is a common issue with third-party services that use their own domains. To fix this, either adjust your DMARC policy to allow relaxed alignment or configure the service to use your domain in the "From" header. If you’ve implemented a p=reject policy too soon, it might block legitimate emails from systems like billing or CRM tools. Temporarily revert to p=quarantine or p=none until all email sources are verified.
4. Propagation Delays
Sometimes, it may seem like your changes aren’t working because of propagation delays. To speed things up, lower your TTL (Time-to-Live) to 3,600 seconds or less before making significant changes. This allows updates to propagate faster. If your updates still don’t appear, flush your DNS cache using ipconfig /flushdns on Windows or sudo killall -HUP mDNSResponder on macOS. For large-scale operations, tools like Mailforge can automate DNS updates and verification, saving time and reducing errors.
Handling dozens - or even hundreds - of domains can quickly turn into a nightmare when it comes to managing SPF, DKIM, and DMARC records. A single typo can wreak havoc on email authentication for an entire domain. Clearly, a more efficient and error-resistant approach to DNS management is essential.
Manually managing DNS records is not only time-consuming but also prone to errors. Here’s how manual management stacks up against automation:
| Feature | Manual Management | Automated Management |
|---|---|---|
| Setup Time | Hours per domain | Minutes for hundreds of domains |
| Error Risk | High (syntax errors, lookup limits) | Low (system-generated records) |
| Scalability | Challenging; requires more staff | Easily handles thousands of domains |
| Consistency | Difficult to maintain | Uniform configurations across all domains |
Platforms like Mailforge simplify this process by automating DNS updates through nameserver redirection. Instead of logging into multiple registrars, you just point your domains to the provider's nameservers. The system then takes care of all the technical records - SPF, DKIM, MX - without requiring manual edits. For cold email operations managing hundreds of domains, this can save significant time and eliminate headaches. You can also stay updated on deliverability best practices to ensure your infrastructure remains optimized.
Another powerful option is leveraging APIs provided by DNS services like Cloudflare, Route 53, or Google Cloud DNS. These APIs enable bulk updates through scripts, making it easy to apply changes across multiple domains in one go. Some platforms even allow batch record updates, further streamlining the process.
Once automation reduces the risk of human error, the next step is to ensure consistency and maintain clear documentation.
To keep DNS management error-free, maintaining detailed documentation is essential. Create a centralized database or spreadsheet to track each domain’s DNS settings, including SPF, DKIM, and DMARC configurations. Be sure to note selectors, policies, and the date of the last update. This documentation becomes invaluable for troubleshooting and audits.
Standardizing nameservers across your zones can also simplify management. As Håkan Lindqvist, a Nameserver Operator, explains:
"Typically as a nameserver operator you would want to decide once and for all what the names of your nameservers are and then use those names for any number of zones that you host."
When implementing DMARC policies across multiple domains, start cautiously. Begin with a monitoring policy (p=none) to avoid disrupting legitimate emails. Once alignment issues are resolved, you can gradually move to stricter policies like p=quarantine and eventually p=reject.
"It is important to remember that only one SPF record is allowed per domain. Having multiple SPF records can disrupt your email functionality." - Network Solutions
Finally, ensure each domain has at least two NS records for redundancy. This provides a safety net in case one nameserver becomes unavailable.
Setting up SPF, DKIM, and DMARC records plays a critical role in ensuring your emails are both secure and reach their intended recipients. When these protocols are properly configured, they authenticate your emails, protect your domain from spoofing, and improve the chances of your messages landing in inboxes instead of spam folders. Without them, even the most carefully crafted outreach efforts can fall flat.
Here’s a real-world example: In 2024, a SaaS client partnered with SalesHive and saw their spam complaint rate drop by 41% in just 90 days. By carefully analyzing DMARC reports and transitioning from p=none to p=reject, they successfully blocked unauthorized senders from misusing their domain. This shift not only strengthened their email security but also boosted their reputation and revenue.
For businesses juggling multiple domains, manually managing DNS records can quickly become overwhelming. Errors in syntax, inconsistent setups, and repetitive tasks can lead to serious issues. Tools like Mailforge simplify this process by automating DNS configurations - including SPF, DKIM, MX, and more - through features like nameserver redirection. This automation not only saves time and reduces human error but also aligns seamlessly with the security practices highlighted in this guide.
SPF, DKIM, and DMARC are three key email authentication protocols that work hand-in-hand to safeguard your domain from spoofing and phishing attacks.
When these protocols are implemented together, they create a robust shield against unauthorized email use. This not only protects your domain but also helps maintain your brand’s credibility and ensures your emails are delivered reliably.
When configuring SPF records, there are a few pitfalls to watch out for:
To avoid these issues, always validate your SPF record and carefully review it to ensure every authorized source is accurately included.
Managing DNS records across multiple domains can be a tedious task, but Mailforge simplifies it with automation tools that make the process fast and straightforward. Whether you're handling SPF, DKIM, or DMARC records, you can update and configure them for dozens - or even hundreds - of domains in just a few steps:
By automating these steps, Mailforge removes the hassle of manual DNS edits, minimizes errors, and keeps your email infrastructure running smoothly with minimal effort.