Sending bulk emails? 1 in 6 emails never reaches the inbox, often due to poor IP reputation. IP rotation solves this by using multiple IPs to send emails, reducing the risk of spam filters and maintaining a positive sender reputation.
IP rotation keeps emails out of spam folders, protects your reputation, and ensures smooth campaign delivery. Whether you go manual or use tools like Mailforge, the goal is the same: reliable inbox delivery.
IP rotation involves switching between multiple IP addresses to send outbound email traffic. In an SMTP setup, this process spreads the workload across a pool of IPs, ensuring that the volume of emails sent from each address stays within the limits set by Internet Service Providers (ISPs). This strategy helps mimic natural sending patterns, reducing the risk of triggering spam filters.
You can implement IP rotation manually - using multiple SMTP servers and scripts to direct traffic - or automate the process with software that cycles through IP addresses based on a preset volume or schedule.
Let’s break down why this approach is so effective.
One key benefit of IP rotation is risk management. If one IP address in your pool ends up blacklisted, the others remain operational, preventing a single issue from derailing your entire email campaign.
It also helps with load balancing. By spreading email traffic across multiple IPs, you can keep each address within safe sending limits. For instance, a single IP can usually handle between 150,000 and 200,000 emails daily. For larger campaigns, a common guideline is to use one IP per 500,000 emails to maintain a strong sender reputation. This distribution also ensures compliance with the per-IP rate limits set by major providers like Gmail and Outlook, helping you avoid throttling.
Additionally, automatic IP rotation has been linked to better open rates and fewer spam blocks, making it a valuable tool for email marketers.
In the next sections, we’ll explore how to set up IP rotation and make the most of these advantages.
(function(d,u,ac){var s=d.createElement('script');s.type='text/javascript';s.src='https://a.omappapi.com/app/js/api.min.js';s.async=true;s.dataset.user=u;s.dataset.campaign=ac;d.getElementsByTagName('head')[0].appendChild(s);})(document,372145,'bgla6zdvtvvykvmfmifs');
Before diving into IP rotation, make sure you have the right infrastructure and tools in place. Below, we’ll cover the necessary server setup and network configurations to get things running smoothly.
To start, you’ll need a Virtual Private Server (VPS) or dedicated server running Linux. Popular Linux distributions for this purpose include Ubuntu, Debian, CentOS, Rocky Linux, and RHEL. Entry-level Linux VPS servers are budget-friendly, with costs starting at around $4 per month.
The server also requires specific software to handle email delivery and security. Here’s what you’ll need:
For network security, tools like iptables, nftables, UFW, or Firewalld are crucial. These tools help manage Source NAT (SNAT) rules, ensuring emails are sent through the correct IP addresses. Once these components are installed, you’ll be ready to add additional IP addresses.
After your server is configured, the next step is setting up multiple public IP addresses for your rotation pool. For effective IP rotation, you’ll need a collection of public IPv4 addresses. Although IPv6 is available, it’s not widely adopted for email systems yet. Additional IPv4 addresses usually cost about $1 per month each. Be sure to select a VPS provider that supports multiple public IPs on a single server.
The number of IPs you’ll need depends on your email volume. For example:
Each IP address must have a valid PTR (Reverse DNS) record and an A record to maintain a strong sender reputation. Keep in mind that some VPS providers don’t allow you to edit PTR records directly. In such cases, you may need to contact their support team to configure them.
Once you have your IP addresses, you’ll need to configure each one with its own Postfix instance using the postmulti tool. Each instance should have unique settings, including queue_directory, multi_instance_name, myhostname, and inet_interfaces, all mapped to its designated IP address. Additionally, set up SNAT rules in your firewall to ensure outgoing emails are routed through the correct IP for each SMTP instance.
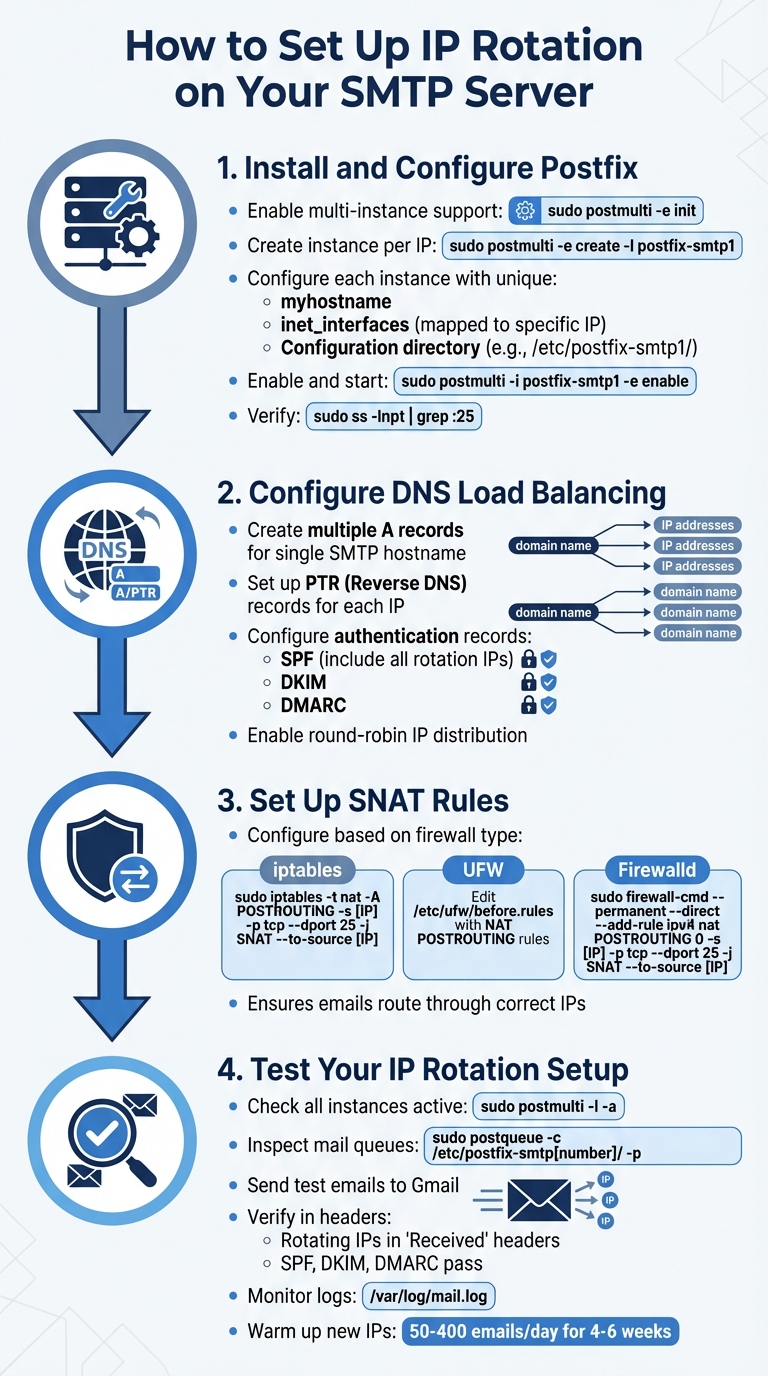
4-Step Guide to Setting Up IP Rotation for SMTP Servers
Once your infrastructure and additional IPs are in place, the next step is configuring your SMTP server for IP rotation. This involves setting up multiple Postfix instances, adjusting DNS records, and ensuring email traffic routes through the correct IPs.
Begin by enabling multi-instance support in Postfix. Use the command sudo postmulti -e init to prepare your system and update the primary Postfix configuration file (/etc/postfix/main.cf) for handling multiple SMTP instances.
Next, create a separate Postfix instance for each IP address. For example, run sudo postmulti -e create -I postfix-smtp1 to generate an instance. Each instance will have its own configuration directory, such as /etc/postfix-smtp1/.
For each instance, update the main.cf file. Leave master_service_disable empty to allow the instance to bind to a TCP socket. Assign a unique myhostname and configure inet_interfaces to the corresponding IP address. Ensure configuration files are copied from the primary spool directory.
Enable and start each instance using the following commands:
sudo postmulti -i postfix-smtp1 -e enablesudo postmulti -i postfix-smtp1 -p startTo verify that each instance is listening on its designated IP, run sudo ss -lnpt | grep :25. Once this is confirmed, proceed to DNS configuration.
After setting up Postfix, distribute email traffic using DNS load balancing. Create multiple A records for a single SMTP hostname (e.g., smtp.example.com), with each record pointing to a different IP address. This allows email clients to connect to these IPs in a round-robin manner.
Each IP in the rotation must have a valid PTR (Reverse DNS) record that maps back to your domain. Without proper reverse DNS, many mailbox providers will reject your emails. Additionally, configure SPF, DKIM, and DMARC records to authenticate your emails and protect against spoofing. Ensure your SPF record includes all IPs in the rotation.
SNAT ensures outgoing emails are sent from the correct IPs. Without these rules, your server may default to sending emails from its primary gateway IP, bypassing the rotation setup.
Set up SNAT rules based on your firewall:
sudo iptables -t nat -A POSTROUTING -s [IP] -p tcp --dport 25 -j SNAT --to-source [IP]/etc/ufw/before.rules and add NAT POSTROUTING rules before the COMMIT line.sudo firewall-cmd --permanent --direct --add-rule ipv4 nat POSTROUTING 0 -s [IP] -p tcp --dport 25 -j SNAT --to-source [IP]Testing is essential to confirm everything is working as expected and to protect your sender reputation. Start by checking that all Postfix instances are active using sudo postmulti -l -a. Then, inspect individual mail queues with:
sudo postqueue -c /etc/postfix-smtp[number]/ -p
This ensures each instance is handling emails independently.
Send test emails to a Gmail account and use the "Show Original" feature to examine the headers. The "Received" headers should show the rotating IPs, and SPF, DKIM, and DMARC checks should pass. Monitor mail logs (/var/log/mail.log or /var/log/maillog) for any errors, such as SASL authentication issues or connection failures.
Keep in mind that new IPs need to be warmed up gradually. Over the first 4–6 weeks, send 50–400 emails daily to your most engaged subscribers. Slowly increase the volume as your IPs build a positive reputation with ISPs.
Manually setting up IP rotation can be a complex and time-consuming task, requiring a solid technical background. Mailforge simplifies this process by automating much of the infrastructure setup. For instance, it automatically configures SPF, DKIM, and DMARC records for every domain you add, adhering to industry standards. This automation slashes the time spent on technical configurations by more than 95%.
Mailforge takes the hassle out of DNS management. Instead of manually creating DNS records for each IP address and domain, it handles authentication and routing behind the scenes. By leveraging a shared IP pool, the platform optimizes deliverability through automated rotation and routing decisions. Plus, you can conveniently update DNS records for multiple domains all at once using a centralized dashboard.
"What once took hours now takes minutes. Mailforge is also cost-efficient since you spend per mailbox ~3 times less than with Gmail." - Danny Goff, Director of Sales at Propeller
Mailforge offers domain masking, enabling you to display branded websites on secondary domains while protecting your sender reputation. This is especially useful for scaling email campaigns. Additionally, the platform automates the setup of custom tracking domains with SSL, ensuring brand consistency in all outbound communications. With over 10,000 businesses - from solo entrepreneurs to Fortune 500 companies - using Mailforge, the shared infrastructure is continually monitored to prevent issues like "bad neighbors" from negatively impacting your sender reputation.
Mailforge seamlessly integrates with other tools in the Forge Stack, creating a comprehensive cold email solution. For example, its integration with Warmforge automates the mailbox warm-up process, simulating natural engagement to enhance sender reputation before scaling up email volume. The platform also includes a real-time Health Score (ranging from 0–100) to help you monitor mailbox performance, with a score above 97% recommended for optimal deliverability. For users handling high email volumes, Infraforge provides private dedicated IPs with advanced multi-IP provisioning to ensure reliability.
"Operating in a high-growth startup environment requires speed, scalability, and operational efficiency. We needed to build an outbound motion that didn't break as we scaled - and Mailforge gave us that foundation." - Isabella L., Founder of Let's Fearlessly Grow
This guide has walked you through the essential steps to set up and manage IP rotation, covering everything from configuring Postfix and DNS load balancing to implementing SNAT rules and testing your setup. While these tasks are certainly doable, they demand a good amount of manual effort and ongoing upkeep to ensure your email system stays efficient and reliable.
Rotating IPs is a key strategy for protecting your sender reputation and avoiding blacklisting by spreading email volume across multiple IP addresses.
If you're looking to simplify this process, Mailforge offers a powerful solution by automating DNS configuration, IP rotation, and deliverability monitoring. What might take hours to configure manually can be done in minutes with Mailforge, freeing up your time for other priorities. Whether you choose a manual approach or automation, the ultimate goal is the same: maintaining a strong sender reputation and ensuring your emails consistently reach inboxes.
For those scaling their outreach efforts, Mailforge’s seamless integration with tools like Warmforge, Salesforge, and the Forge Stack ensures reliable inbox delivery, whether you're sending a few hundred or hundreds of thousands of emails. Don’t forget to keep an eye on your Health Scores regularly, and when manual management starts to slow you down, it might be time to explore automation tools. By applying these principles, you’ll set yourself up for better email deliverability and stronger campaign results.
IP rotation involves using multiple IP addresses to distribute email traffic. By keeping the volume of emails sent from each IP within acceptable limits, this approach helps avoid blacklisting and preserves your sender reputation. As a result, your emails are more likely to reach recipients' inboxes instead of being marked as spam.
This practice is particularly beneficial for bulk email campaigns. It ensures reliable deliverability while preventing your email infrastructure from being overwhelmed or penalized by service providers. For businesses handling large-scale email outreach, IP rotation plays a key role in improving email performance and maintaining trust with recipients.
To configure IP rotation on an SMTP server, you'll need a few essential components. Start with an SMTP server, such as Postfix, which is often set up using tools like iRedMail. You'll also need a VPS (Virtual Private Server) equipped with multiple public IP addresses. The key is to configure Postfix to run separate instances or bind each instance to a specific IP address. This setup allows outbound emails to rotate across the available IPs.
Don't forget to implement standard email authentication protocols - SPF, DKIM, and DMARC. These records are crucial for protecting your sending reputation and ensuring your emails are delivered successfully. For more advanced or scalable configurations, platforms like Infraforge can streamline the process. They offer features like multi-IP provisioning and other tools designed specifically for managing cold email infrastructure.
Mailforge takes the hassle out of IP rotation by automating DNS and domain setup, eliminating the need for manual management. With its shared IP pools and scalable infrastructure, it smoothly handles IP switching, ensuring consistent and dependable email delivery for large-scale campaigns.
By automating these processes, Mailforge not only saves you valuable time but also enhances your cold email outreach, allowing you to expand your efforts without sacrificing deliverability.